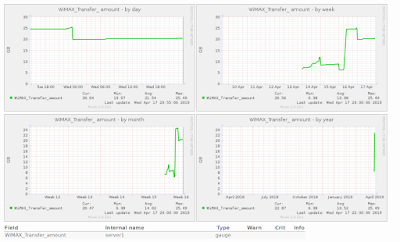
wimax転送量をmuninで監視する WiMAX HOME 01
Wimaxの転送量をmuninで可視化したいとおもった.
ログインしなくても,WiMAX HOME 01のトップページに3日間の転送量が出ているのでこの値と使おうと思った.
Raspberry Pi 3で構築
0.準備
python3をインストールしておく
$> sudo pip3 install selenium
1./usr/local/bin/chk_wimax.py を作成.
-------------------------
#!/usr/bin/env python3
from selenium import webdriver
url = 'http://192.168.3.254'
# Selenium settings
options = webdriver.ChromeOptions()
options.add_argument('--headless')
driver = webdriver.Chrome(executable_path='/usr/bin/chromedriver', chrome_options=options)
driver.get(url)
mycount = 0
for myli in driver.find_elements_by_tag_name("li"):
mycount = mycount +1
if mycount == 12 :
print(myli.text.replace("GB/10GB","").replace(" ",""), end="")
#fuga_str = driver.find_element_by_class_name("value")
#print(fuga_str)
#myPage=driver.page_source
#print(myPage)
driver.quit()
---------------------------------------
2. /usr/share/munin/plugins/munin-chk-wimax を作成
ルーターのIPとかは自分で変更
------------------
#!/bin/bash
if [ "$1" = "autoconf" ]; then
echo yes
exit 0
fi
if [ "$1" = "config" ]; then
# グラフタイトル
echo 'graph_title WiMAX_Transfer_ amount'
# グラフ縦軸
echo "graph_vlabel GB"
# グラフのスケール設定
echo 'graph_args --base 1024 -l 0'
#カテゴリ
echo "graph_category WiMAX"
#グラフの縦軸の制限
echo graph_args --lower-limit 10 --upper-limit 30
# 凡例の設定
# each line name
echo server1.label WiMAX_Transfer_amount
# echo server2.label WiMAX_Transfer2_amount
#ライン値設定
echo server1.draw LINE2
# echo server2.draw LINE2
exit 0
fi
# collect
CMD=`/usr/local/bin/chk_wimax.py`
echo server1.value "${CMD}"
#echo "server1.value 1.55"
#echo "server2.value 5.12"
-------------------
で
$> sudo ln -s /usr/share/munin/plugins/munin-chk-wimax /etc/munin/plugins/munin-chk-wimax
で登録,ラズパイ再起動でとれると思う・

コメント
コメントを投稿